Saturday 30 July 2011

The 5 Gold Fish are In!

Can you see the orange fish! They love it in there!
About 6 months ago a client of mine asked me to chainsaw up some old timber furniture and a wine barrel in to fire wood for them. The wine barrel had a hole chopped in one end and had been used as a dog kennel. Other than the hole the barrel was in excellent condition. far to good to be used as fire wood. I chopped the top third off using a chainsaw. The end with the hole in it I took up the back garden, sat it on the ground and filled it up with good soil. This will be planted with strawberries.
The finished wine barrel fish pond!

The good bit of the barrel I sat up on bricks in a garden bed which can be seen from in our living room. I filled it up and over the next week it swelled up and no leaks at all perfect for a water feature come fish pond.  I let it sit for another week then bought some native water plants a small native water lilly and a native rush type plant. They have been planted in terracotta pots filled with dirt, then I used gravel to cover the dirt so the dirt doesn't much up the water. I then left the wine barrel with plants for another month so everything could settle and algea, water bugs, insects, etc create a proper aquatic environment.  Now algea, bugs, plants, etc are thriving which means fish will thrive and have something to eat!  SO today I went and bought me some gold fish. Five in all, 3 yellow/gold 2 normal orange gold fish. They are in and loving it. Time will tell if I need to put mesh over the top of the barrel. Kookaburra's may be a problem!


Fig Trees Planted

2 Fig Trees planted with swales &
tree guards installed

Well I finally decided on where the two Fig Trees will be planted and with a beautiful sunny warm winters day another day pottering was in order.  Because Fig Trees get so SOOO BIG if left to them selves I will be training and pruning my two figs Espalier Style.  Two holes were dug, half filled with water, some Dynamic Lifter pellets and blood and bone fertilizer was added, then the trees planted and the hole back filled with soil mixed with Blood & Bone and more Dynamic Lifter pellets.  Chook protection was added to protect the trees while growing. A few bits of aviary mesh were made into a few tree guards with a few wooden stakes used to hold in place.  I then made a couple of earth swales to help capture water following the contour of the land. I used rocks laying around to retain the swales and protect them from the chooks scratching!!!  The end result is great. Grow you little fig trees GROW!
I want to start training them into Espalier. I've never trained fruit trees to Espalier.  I'm excited!!!!  
Close up of rocked earth swale & tree guards in

Friday 29 July 2011

New garden bed built! Now what to plant.

Chooks always love it when I did in the garden!
Lots of goodies to eat.
I had some daylight left after planting the Avocado trees so I built a new garden bed ( I think I will plant strawberries in it). I used rocks as a border and to retain the soil. As you can see in the photo's as usual the chooks were keen to help! eating anything that was edible as I dug.
This has defined the pathway up to the chook shed a lot better. I will mulch this path with pine mulch
(i have a huge pile of mulch from the Pine trees I removed up the side of our driveway). This will make it a lot less slippery in the wet.   
Well it's Saturday morning and while cleaning out the chook shed this morning and replacing all the old straw with nice new stuff I noticed lots of gum leaves and small twigs covering the lawns. They had built up over the months and needed raking up. Now in the past I would have burnt them, but i decided to pile them up and run my mulching mower over them and use that as mulch on the path instead of wheel barrowing loads of mulch up the hill all the way to the back of our property.  So not only have i got rid of the leaf build up problem they have made a perfect bush mulch for the path up to the chook shed which was getting slippery when wet!  Awesome, this will be continued in the future. No burning leaves any more!!!
The newly finished garden bed. I'm thinking strawberries
will be good here!

The piles of leaves and twigs turned into
great mulch path. Perfect!

Avocado Trees in and a New Garden Bed too!

Logs around tree to stop chooks digging around tree
Many weeks ago I ordered 2 Avocado Trees & 2 Fig Trees. Now I've never bought plants through the mail but they came this week!  and all plants were well when they arrived, Woo Hoo!
I got 1 Bacon Avocado 'B' type & 1 Hass Avocado 'A' type. Avocado's are self fertile but if you plant 'A' & 'B' types you will have the best possible pollination possible. Since ordering these trees I have discovered Wurtz 'A' type which is a dwarf avocardo tree. These can be grown in pots, half wine barrels are perfect size. If I had my time again I would have bought this so prunning wasn't needed.

Today I finished work earlier than I thought I would, so I had some time to relax and loose myself in the rear garden. Oh the bliss.
Now it was a revelation that you could grow Avocado trees in Kallista, i thought they were tropical fruit and never dreamt I could grow them here. Now they are large trees growing 4-8m high and wide. but as with all fruit trees you can prune to size with in reason. The first few years they need to be looked after a bit. They are susceptible to frosts, gladly we have never had a frost here, they also need protection from hot summer winds. I didn't even think about how big they grew when i ordered two. BUT after some walking around the garden over the last few days I 'found' the perfect place to put them!  The only problem I needed to move some of the wood pile behind the shed to make room for them. This position is sheltered from winds and snow (if/when we get it).
Double height tree guard with long bamboo stakes
The trees in pots were submerged in a bucket of water to saturate soil.  Holes where dug for each tree, blood and bone added to the soil then the trees were planted and tree guards put around trees. I decided to put logs around the tree guards so the chooks don't scratch and dig around tree. Two tree guards where taped together to get the height needed to protect the whole tree.
The placement of the avocado trees will provide shade to the chook house and pens when they grow bigger. The wood pile will be gone by the time the trees have grown.
I am enjoying the anticipation of all these fruit trees coming into production over the next two to three years. I really think I'm proving with time, planning and some hard work it is possible a third of an acre can be a productive, sustainable "farm". I love my back garden.
Oh I also planted my 10 Raspberry canes. I had them sitting in a bucket of straw bare rooted, but noticed the buds starting to burst. So I planted them out into a garden bed which last summer had veggies in it. I will build a trellis for them soon with a poly pipe frame to support bird netting. Yes I want the raspberries not the birds!!!  I will post photo's of the canes and trellis system soon.  

Sunday 24 July 2011

Rosella, Sugar Glider or Micro Bat Log Home

Log panel attached to plywood box
Log panel finished with entrance hole
and perch in place 
Well I've been itching to make my first animal Log Home/Box to put up in the garden. My wish is to attract a sugar glider or feather tail glider into a Log Home I've built.  I used the chainsaw to cut a front panel for the box off a log from a Black Wood tree. A very hard wood with good textured bark. So with this front panel cut into shape approx 250mm wide 490mm high I used a 65mm hole drill to cut the entrance hole into the wood panel. The first problem encountered the drill wasn't deep enough to go right through the wood panel. So out with a small chisel and hammer to cut a hole 65mm right through. I had some external 21mm form plywood left over from building my chook house which I used to make the 2 sides, base and lid for the box.  I painted each cut with a wood sealer to help seal the plywood so it's more weather proof. a hole was drilled a little smaller than the diameter of the perch/branch. I filed the end of branch/perch to a taper and then hammered the perch into the hole. It's a tight fit and will support the largest of birds or possums. I drilled and screwed the plywood base, sides and back together. I then screwed the log panel to the front box i applied liquid nails to the panel and front of the box for added strength. Care was taken no sharp screw points are exposed.  A lid was then attached using a couple of stainless steel hinges. It's important to have access to the nest in case feral animals take up residence and you need to remove it. 50mm of saw dust and wood shavings have been put in the base of the nest this imitates how a natural log hollow would be. Now my first box is complete I need to let it rest until the paint and glue is dry and the fumes are no longer smell. 3 drain holes have been drilled in the base, a hole drilled up the top of each side which will be used to hang the box in the tree. I will use plastic coated clothes line steel cord threaded through the box with garden hose over the cord where it comes in contact with the tree branch supporting the box.
The finished home with hinged lid
I will post a photo when the box is installed in the tree. I'm very happy with the finished nest box. Just hope the birds or bats or gliders are happy with it and something makes it their home!

Saturday 23 July 2011

Put that paving back PLEASE!!!!


Leveling the base before pavers are laid
A beautiful winter Saturday morning in Kallista, sun shining, no wind. Me just pottering about in the garden chainsawing up some timber slabs for the bird/sugar glider boxes I'm making. (more of that in a latter post). My wife then asks can you maybe re-do the paving you pulled up when you fixed the plumbing today. Now this was not a question however kindly it was asked! She was right it was a priority as rain is forecast for tomorrow. We can park the car up near the house but when we get out the car you stepped onto the dirt strip without paving and have to cross it dirt strip 2 to get to our front door.
So with shovel, gloves and rubber mallet i get to work. I shovelled out some of the excess dirt leveled the dirt making sure it was a little higher than needed and placed pavers down one by one settling them into the dirt using the rubber mallet until the pavers were level with the other pavers.
When the paving was all laid i did a final tidy up removing the pile of excess dirt and the old terracotta pipe which had caused this mess in the first place.
Job completed.
And now it's Sunday raining solidly and we can get into and out of the car and into the house with out having to avoid mud piles!

Rubber mallet used to seat the pavers in 

Monday 18 July 2011

Cat Bibs On!!!!

Timmy as happy as normal, still his adventuresome self
Kitten not so sure and a little grumpy
Well following up from an earlier blog. I received the Cat Bibs in the mail today. So simple, so easy to put on. Didn't even have to take off the collars. Just slip a tab under the collar fold back Velcro on it's self and all done. using a permamant marker I put the cats name on it and both my Wife and my phone number on them. In case they are caught for any reason!!!
'Timmy' (he was named that by RSPCA before we got him) adjusted very quickly and was outside climbing over & through fences, running around and not really fussed at all. 'Kitten' however was a little grumpy, and very tentative, but didn't take long to venture into the garden. She was a lot more clumsy and didn't look happy at all. I read the literature about the Cath Bibs that came in the mail and discovered you can adjust the height of the bib so the cats don't trip on it. I readjusted 'Kittens' bid and hey presto much better.
After a few hours on even Kitten has got over it and is just going with the flow. Now I just need to wait and see if the number of lizards caught and brought inside is reduce. To be honest the number of birds caught (that we know about) has been very few only 3 or 4 in three years. Quite a few lizards are caught so I wait and will update post from time to time and let you know how they go.
have already received a phone call from a concerned neighbour asking if they cat is alright has it got caught in something or been to the vets? I advised her what they are and she was impressed.
If nothing else it shows we are responsible cat owners trying to reduce the impact of cat ownership living in the hills.

Saturday 16 July 2011

Get me out of there I'm going NUTS!!!!

Rock swales to capture water 
Since Wednesday I've been sick. The worst cold/flu/chest infection thingy I've ever had, culminating in me loosing my voice on Friday morning.  I sound like I'm going through puberty all over again, voice breaking/squeaking when ever I open my mouth. The doctor on Friday said I should start improving over the weekend. It's
Sunday I'm feeling a bit better still no voice and a bit chesty but I have to get out into the garden I'm going NUTS inside. A small job outside was in order. I have been reading about Contour Swales lately and knew it would be perfect for the citrus trees I planted a year ago in the back garden.
Garden Swales capture water, holding and slowing it's movement down and concentrate it where plants can use it.  Today I dug the soil from the top side of the trees and made a bank following the contour of the land below the citrus trees. I used rocks to stabilise the swale and protect it from the chooks. Finally I have mulched around the trees. Now my citrus trees are ready for a hot summer. And the best thing I went inside and had me some of the best home made Salted Chocolate Caramel Slice my wife made today. It is So good!!!! Her Belly Rules Blog is linked it's well worth looking at to get the recipe to this amazing slice.
Water saving ideas that look good to!
Swales following contours on land

Wednesday 13 July 2011

Wildlife Boxes for Birds, Possums & Insects?

Now I'll have the cats under control and much, MUCH more handicapped in terms of catching wildlife, due to the cat bibs, I can focus on providing more homes for wildlife in our garden. I want to attract as many beneficial insects (Lady birds, lacewings, praying mantis, native wasps, & bees) as possible to help control the pest insects.  We need insects in our gardens to pollinate and eradicate the nasties in our garden. A healthy mix is what we are after. Not total control but a healthy equilibrium.
Next to my garden orchard and chook house is a big pile of fire wood, this provides natural habitat for many types of inspects, spiders and other creepy crawlies. All good for a healthy garden. But I want more. So I have found some paper bark logs from a tree I pruned. I drilled a whole lot of holes into the logs and have sat them in the garden orchard. Not only will the drilled holes provide homes for solitary native wasps, bees & other insects but the loose paper bark provide natural shelter as well.
I'm in the process of building a few different types of insect homes as well one is basically a small box in the shape of letter box, filled with straw with numerous holes or slits into the box. Another one is a box frame with no top or bottom filled with cut lengths of bamboo. The bamboo is hollow providing lots off holes, nooks & crannies for insects to hide and live. When complete these will be attached to the trellis posts in the orchard to hopefully attract spiders,  lace wings, lady birds & other beneficial insect that help control nasties in the orchard and veggie patches.

Then there is the possum box a few bird boxes for small parrot sized birds, maybe an owl box and a bat box!
(PHOTO'S TO BE ADDED AS THEY ARE FINISHED)

Cats and Wildlife DON'T Mix, But I love Cats?

Now I'm a country boy at heart. Since moving to the country I always had a dog, loved em they were my best friends. But now I find myself living on only 1/3 of an acre with a busy life and i couldn't give a dog enough time to be fair.  We have two cats who I adore. So snugly and affectionate BUT I know they are killers, we have collars with bells on then but I'm sure they don't work!!! in fact they bring home lizards mainly the occasional bird and these are only the ones we see. What to do. Well my friends I have just stumbled onto a great invention. The Cat Bib.  Go to www.catbib.com.au and have a look I've just ordered two one for each cat and they will have them on every day, only $16.95 each. The neoprene bib attaches to the cats collar with velcro and hangs down low so that when a cat pounces the feet hit the bib and interfer with the natural hunting methods.
So now i feel much better snuggling up to my 'killers' knowing they will be killing much less when my cat bibs arrive in the next 3-4 days. I'll keep you posted with how they work.
The following info is taken directly from the CatBib wedsite i am in no way involved with this product or recieving finacial gain. I just think it's a great product for people who love thier cats but know they are naughty!!!! Brilliant idea.
The Murdoch University trial scientifically proved that CatBib stopped over 80% of cats killing wild birds and reduced small animal predation by almost half.
Big Bib PicturePicture Placeholder

New Catbib Size - the BIG BIB

Now choose from two sizes of CatBib...
the Regular/Small CatBib (AUD $16.95)
and the new BIG CatBib (AUD $20.95)
Save even more birds!
Please Note: Whether to choose a Regular or a BIG CatBib is based on your cat's aggression NOT on the size of your cat.
If you are unsure, opt for the regular size first – there’s a better than 80% chance it will work well.
The regular triangular-shaped size was tested by Murdoch University Biological Sciences Department and has been scientifically proven to stop 81% of cats from catching birds, 45% of cats from catching small mammals, and 33% of cats from catching herptofauna.
But what about those few more aggressive cats, the 19% (1 out of 5 cats) who continue to catch some birds? For those more aggressive cats, an experimental BIG CatBib was sent out and tested by customers. This larger size stops almost all of even the most aggressive cats from catching any birds! So much so that the CatBib’s record of stopping cats from catching birds is nearly 98% effective. In other words, testing has shown that 81% of known bird catching cats will not be able to catch a single bird wearing the regular sized CatBib. The more aggressive 19% of cats who can still catch some birds with the regular CatBib, can more often than not, be prevented from catching any birds by wearing the new BIG CatBib.

Keeping The Chooks Healthy and Warm in Winter!!!

Well the last week has seen winter hit with a vengeance, cold & wet most days. The mud has been kept to a minimum in the chicken pen because of the bales of straw I had already spread on the ground. My thinking is this straw is being turned over by the chooks constantly, I chuck seed and food on the straw and the chooks dig through it turning it over and over pooing all the time adding fertiliser. In spring I will collect all this rich mulch to use on the veggie patch & orchard.
Perspex window 

The finished chook house done finally!
The chook house has 3 windows. 2 small windows opposite each other on opposing walls with wooden eaves protecting them from rain and wind. On the front of the chook house above the nesting box is a large window made from steel reinforcing mesh. Great for ventilation in summer but I think a bit to cold in winter. One of the gates a bought for the chook pen off ebay had a sheet of perspex attached to it which I took off to reduce the weight of it, I stored it in the shed I knew it would be useful for something. I measured the window and cut a piece of perspex to fit, attached a sliding bolt on both sides of it pushed it into the window drilled tow holes for the sliding bolts, and presto, fully water proof and wind proof. The chooks should now be much more cosy during winter, light can still get in, and in summer i can easily remove it to allow for full ventilation to cool things down. A perfect solution!


One Retaining Wall Please!!!

The retaining wall finished, but i still need to tidy up!
The neighbour, who I get along with really well is putting a driveway up the side of his property right on our boundary. The problem is the earth bank was near vertical and had no retaining wall. As he would be driving on it I wanted it retained. The neighbour being the nice bloke he is, offered to pay for the steel posts. So here's the result. H steel is 1200mm above the ground and concreted 600mm into the ground.
Steps up into the rear garden
Treated pine sleepers are 2400mm long 75mm thick.  Sleepers longer than 2400mm are not strong enough for this height of retaining wall, so should not be used when an engineered wall is needed. The posts were left for a few days to let the concrete set. The the sleepers were then just slotted into place.  Smashed up bricks and rubble was put 300mm deep at ground level behind the wall to provide drainage so water doesn't build up behind the wall. The slope of the land means water will naturally run away from the wall and not build up behind it. I'm happy with the result. I just need to clean up and wheel barrow all the extra dirt away, a job that keeps being put off for some reason! At the same time I decided to make a set of steps up into the back garden from this side of the property. A simple matter of digging into the bank and using sleeper off cuts I had laying around and using cut up star pickets hit into the ground to retain each step. Now the neighbour can lay lilydale topping up his drive way up the side of his house.

Tuesday 12 July 2011

More parking please!!!

This is the lower car parking spot good but not ideal.
If anyone has ever looked at real estate in The Dandenongs they will quickly realise access and parking spaces are at a premium. Our place was one of the better ones we saw with in our budget. to put simply it was great by standards in the hills. We can drive right up next to the house where there is a single parking spot. We have to back down the drive and back into a single width car parking space to allow us to drive out the drive forwards again.
The new improved widened car parking area
When our friend recently came with a 5 tonne excavator to remove stumps and do some trenching for us. We also got him to widen our lower car parking area. Cutting into the hill and putting that dirt on the bottom side, thus making a much more usable space. Its now fantastic we can now park two large cars/utes side by side easily. It has now rained on and off for the last 3 days meaning when ever a car is driven on it lots of mud is left up and down the drive, making a huge mess. So yesterday I had 4 cubic metres of crushed rock delivered and spread over all that sticky, yucky, messy MUD!!! the fill on the bottom side needs time to settle and can not be driven on yet. It would give way and cause any car to roll down the hill so I put up some star pickets and safety/warning tape so visitors don't get into trouble.
To complete this area I have to build a retaining wall to support the ground to the left of the ute, and when the fill settles and in stable and solid I will plant some native Bottle Brush shurbs to give the birds and wildlife some shelter. When money is available I now have an area I can build a proper MAN SHED. It will mean I have a dry area to work and a large more practicle area than I have now to store tools, etc. A car port can go out the front meaning cars can be parked under shelter and be protected. (Another day another project)! AND the area above where the retaining wall will go gets sun all day and is a perfect place for my Raspberry & Blackberry patch complete with trellis, but that's another project.

With gravel spread & safety barrier up. Just the
retaining wall to go on the top side.

Bad Weather = Another Road Blocked

Well trees across the road and landslips are a regular occurance up in The Dandenongs especially during winter.  But this was out of the ordinary. Large tree across road a shock but nothing out of the ordinary. But look at photo more closely and you will see a car behind the large tree no problem. But look closer still and you will see a smaller tree down further up the road with a car under it. Yes one car hit by the smaller tree one car trapped between both trees, and people are asking me  if I have a chainsaw. I had two in my ute but I think even this one would have been a bit big for me to tackle on my own!

Fix the Plumbing Once and For All

So I knew the plumbing at this place was woeful, but we have had all the plumbing renewed, haven't we?
Buying an old house always brings with it the 'JOY' of finding where everything is. The storm water pipes, the drains, where is it all. After months of investigation involving probing the soil, digging and cursing I thought I'd finally worked out where all the external plumbing pipes were located, Septic, sewage, storm water all accounted for. BUT!!!!!!!!
Old pipe did 90 degree turn away from house
down  the drive then came back across  drive
reconnecting at end of house. The new pipe
is straight!
When digging the trench for the underground electricity cable another terracotta plumbing pipe was discovered/broken. at the bottom of the drive all the way to the top the pipe clearly hadn't had water in it for years. But then right up the top of the drive water was in the pipe. It made no sense all the old terracotta pipe at the back of the house had been renewed in the last few months, and reconnected to all the services in the Kitchen, Laundry & Bathroom. These pipes were blocked, cracked and broken by tree roots of a large Blackwood tree covered in Ivy which we had removed.
I had assumed the main storm water pipe stayed close to the house connecting up with pvc pipe I knew was there. but no the terracotta pipe did go down the side of the house but then did a 90 degree turn away from the house under our drive down the boundary then another 90 degree turn back across the driveway connecting with the new PVC pipe to our storm water outlet. BLOODY HELL!!!!!!
Old pipe out

So the only thing to do is what any self respecting plumber would have done in the first place, remove all old terracotta pipe and replace with new PVC pipe.  No more fragile terracotta pipe is left now. I dug up the old terracotta pipe (the last of the rotten stuff finally) along the side of the house and reconnected with PVC storm water pipe. Leaving the broken/smashed terracotta pipe on the other side of the drive in place. Basically I have bypassed a number of U turns in old terracotta pipe reconnecting with existing PVC storm water pipe further down the line. So now storm water pipes are simple straight lines following the side of the house, instead of a maze of pipes zig zaging across the drive way. It was MADNESS.

All done and back filled pregnant wife can park next to
house again. Mission accomplished.
So who would have known I had an inner plumber with in. Very satisfying finally solving our plumbing woes. No more blocked/broken pipes, the drains/sinks/spa bath & shower finally drain quickly and trouble free.  WOOOOO HOOOOOOO!

A babies on the way, WHAT NOW!!!!!

Funny how a pending baby (our first) changes your priorities. You see our baby is due in November this year, actually due on my birthday! The doctors can be pretty accurate as ours is an IVF one!  So it will be the start of summer. Now we don't have air conditioning, yes we are in the hills but we still get some days which are a bit hot! We wanted to get air conditioning but were told by a friend who is an electrician we couldn't until we upgraded out switch board, do it I said! Not that simple. Here comes the list of things that is needed before we get air conditioning!
Drive way before trees removed

Trees gone, Stumps gone, pit in
cable and conduit ready to be connected
We were told by the electricity company we couldn't up grade the switch board until we put the power underground. I organised with the power company to come out and install a ground pit where our underground power could connect to.  A friend who's an electrician will be doing the work. He organised the paper work with drawing of what is needed, nearest power pole location, etc, etc. Only to be contacted by the power company advising his drawing were wrong we had a power pole closer half way up my drive. Now I know the difference between a cypress tree and a power pole. (one much easier to chop down than the other)!!!  I can assure you we have NO power pole up our drive. But alas the power company was adamant it was there. They would have to send out their surveyor's to ensure I was telling the truth! So some months later it was confirmed no power pole existed on our drive way! and a pit was installed.
Now i knew where the pit was we needed a trench dug from it to the switchboard on the house.
Proof conduit & cable 600mm deep
The pile of removed stumps
The only place we could practically put this trench was up the side of our drive, where a line of cypress trees were growing, all the way up the drive. First things first, I slowly chopped down the Cypress trees, stacking the branches in a few huge piles. When all trees were chopped down I got a huge chipper up and chipped all the branches up to 7 inches, I  chain sawed up the large stuff and will burn in our fire heater.  Now I had a row of stumps which needed removing. These stumps were all within 30cm of our lovely bitumen driveway. I could see it being demolished when they were removed.  A good friend and his wife, new borne and young toddler son came up last Saturday with a five tone excavator and pulled out all the stumps, dug a trench 700mm deep helped me lay the conduit and power cable from the electricity pit up the side of my drive across the drive nest to the house below the switch board which will be replace. a few sections of the drive were damage but it's a testament to how good an operator said friend is with an excavator! A true legend. During the digging of the trench an old terracotta pipe which was no longer in use was dug up. How ever at the top of the drive I noticed water coming from the pipe. Now with out going into a huge side storey, recently we had all our plumbing to kitchen, laundry & bathroom dug up at the back of the house and replaced the old terracotta pipe, which tree roots had cracked, blocked and wrecked with new PVC pipe. This will be another post explaining the joys of our plumbing issues! back to the trench. I decided we would finish laying the conduit and cable, back fill the trench then early that week I would take a day off work and fix the plumbing issue!
So now I have the cable in the trench back filled and MUD everywhere. The clean up begins, read next blog to see whats next!

My Garden Orchard

Picking Pink Lady apples on parents orchard 
This is the inspiration picking Fuji apples
Now the chooks are settled in and looking after them selves free ranging all day every day with not a worry in the world it time to put in my orchard. The year I finished y12 at school my parents bought an apple and stone fruit orchard in Batlow, NSW, I worked full time on it, dad and myself quickly learning what was involved in bringing back a run down orchard into a profitable, productive modern orchard.  Towering apple trees 50 years old or older in the old Vase shape on seedling root stock were slowly pruned in half using chainsaws and air powered pruners & loppers.  Over the next 5-6 years a large percentage of the orchard was dozed the old trees burned and new apple trees on M9

and M26 dwarfing rootstock with the latest varieties, (Pink Ladies, Braeburn, Gala and Fuji apples) were planted using an intensive trellised system. I miss the orchard. So time to have an orchard again to potter in and prune and manicure.

I went up to check my chooks one afternoon and realised there was a perfect spot for my orchard in front of the chook pen between the pen and the citrus trees. (2 lemons & 2 limes, a Kaffir & Tahition).   I measured out the space and staked out three rows 2m apart. The rows could be 8m long with 5 trees 1.6m apart. Fifteen pome fruit trees in my little garden orchard.                    
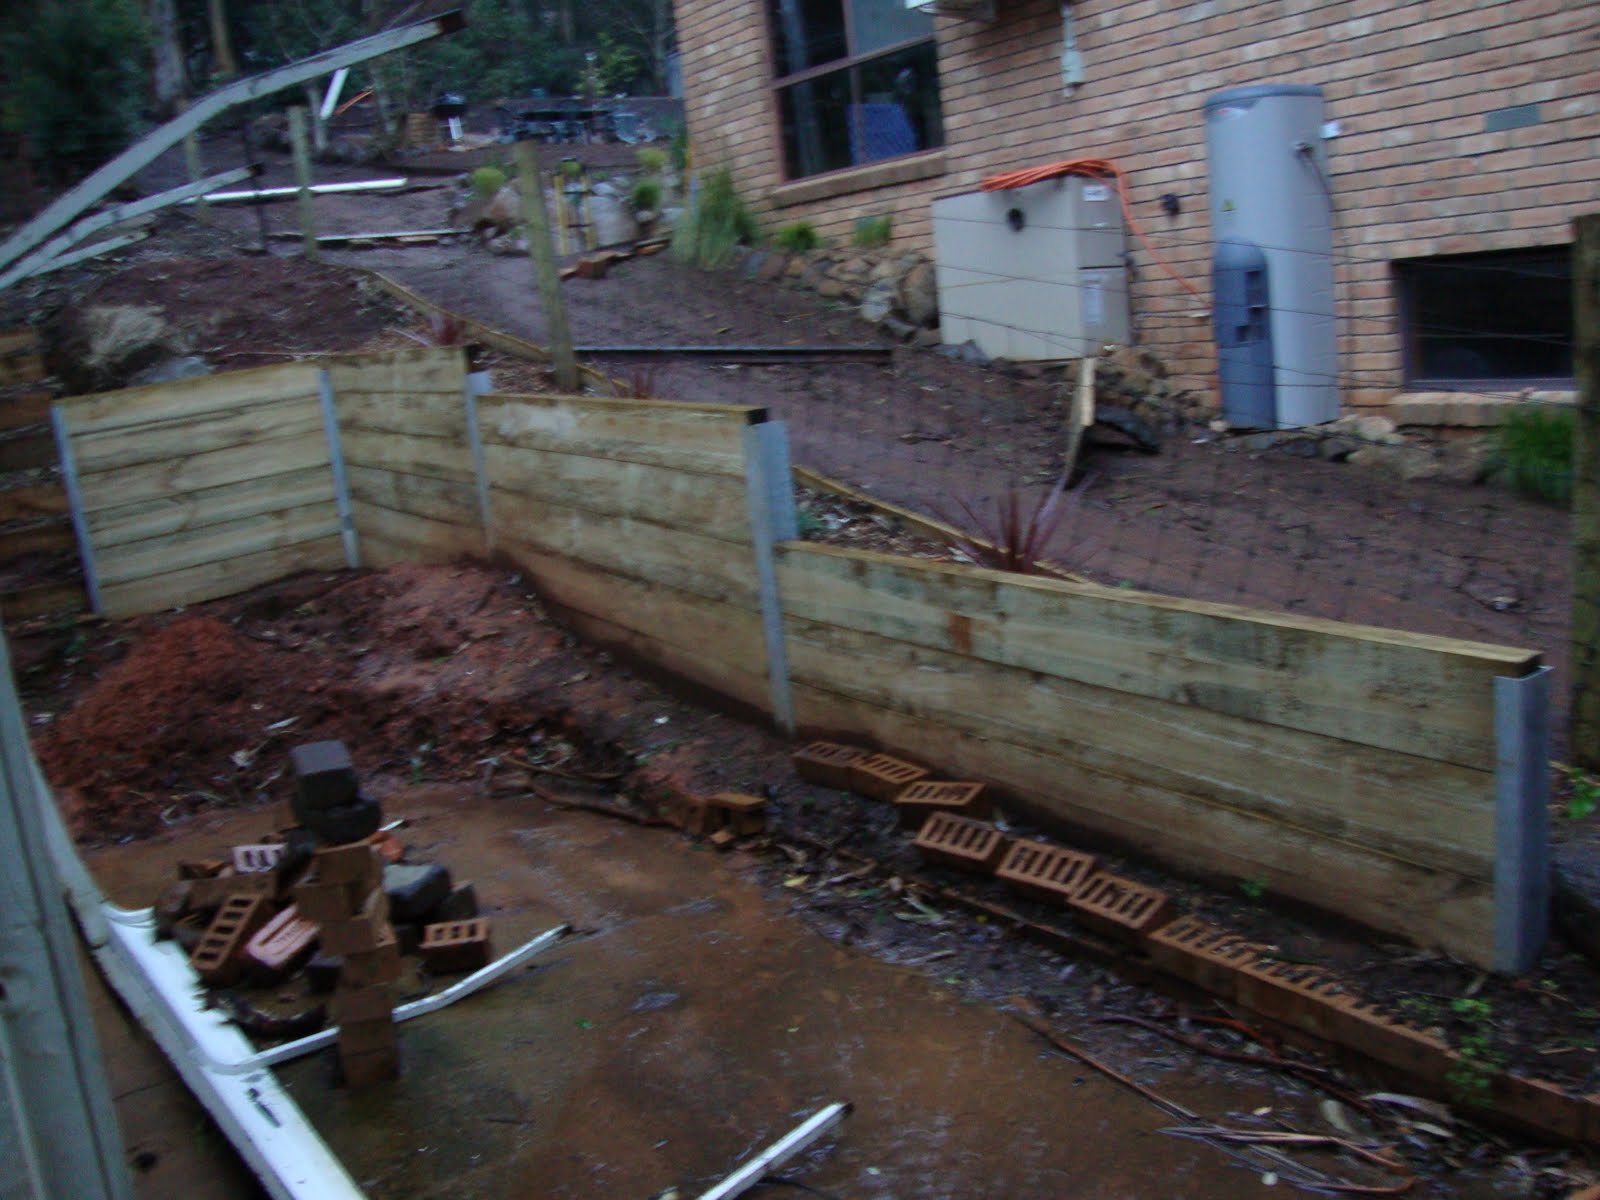
All pegged out ready to put in trellis 

The posts are 2400mm long, 600mm deep in soil with 2.4m long posts used to connect end post with stay post. A hand post hole digger was used slight smaller in diameter than the posts. A point was cut on the end of each post then driven into the ground with a BIG heavy hand post driver. The posts are NOT cemented but are still very solid. Wire was looped around the bottom of each end post and the top of the next post in.  I used Gripples to tighten up the stay assembly. Each end stay assembly was strained up solid. Then a four wire trellis system was attached to each row. The first wire is 400mm from the ground then 450mm spacing for the next three wires.        
The chooks helping dig the holes during
planting of the trees.
This makes a solid strong trellis with lots of options for tieing the trees to and training branches to. 

Now the back bone of the orchard is set up the fun begins. I get to choose what apples and pears to grow.  I'm fortunate a local in Olinda supplies Heritage apple varieties he has access to over 800 varieties I'm told. Picking 15 wasn't hard! Oh to have some acreage!  Here's a list of the trees I'm getting.

First Row: Corrella Pear (my wife's favourite), Sensation Pear (a full red pear), Cox's Orange Pippin, Rosebury Pippin (an old cooking apple), Elstar (a coxs orange Pippin alternative)

Second Row: 2 Pink Lady, Granny Smith, 2 Red Fuji

Third Row: 2 Royal Gala, Snow apple, Jonathan, Petty's red Jonathan.

The trellis posts ready for the wires to be installed 


I picked up the trees all bare rooted took them home and filled up a container with water and soaked the roots of all the trees. Then I dug holes twice the size the roots needed for all trees. I mixed some blood and bone and a hand full of dynamic lifter pellets into the pile of soil which would be placed back into the hole when planting.  The hole was half filled with water, the tree placed in the hole making sure the graft union was well above soil level, and the hole was back filled making sure the soil was firmed around the roots with no air gaps which could dry out the roots. As the trees were mainly whips all trees were cut off at hip height, with all branches chopped off as well. This will give the roots a chance to settle in and grow, then in spring when they shoot all trees will be uniform and at the same stage of training. All trees were then tied to the trellis to support them.
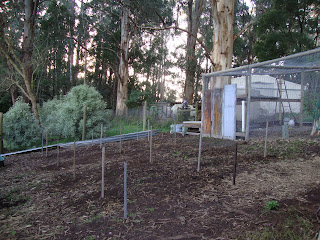
Orchard all planted with chooks already doing there thing!

I tacked labels for each tree on the post closest to the trees so visitors can read a little about each variety. And now I wait till spring time when these dormant trees shoot and grow.   
I haven't decided what method I'll be training the trees to, Espalier, Slender Spindle, or the Solaxe system are my options. i have time on my hand to decide how I train the trees. Maybe one row of each training method.  I'll go into tree training in spring when the trees start growing. 

The new chooks need separating from the youngs ones!

The new older Isa Browns are pecking the younger birds and they need to be separated. What to do!
The new pen to separate naughty chooks!!!
 I decided to close off 2.5m of one end of the pen. Another post was put in to create a wall of wire another post put in to support the gate and the whole area enclosed with wire. The corrugated iron is to provide shelter from the wind and rain.  I can also use the roof as storage for cages, extra feeders, etc.
Building this pen using the end of the pen inspired me to build another one up the other end of the pen. I built it exactly the same but it was split into two separate pens. This means when/if I start breeding chooks to eat I can separate roosters, brooding hens and young chickens. Its now a truly versatile pen with different pens with in the main pen, meaning all pens are fully predator proof.                                                                                                                                                
This is the new nest box which has 3 nests.  Its up off
the ground for added insulation, & keep it out of mud.
Each morning when I let them out to free range in the garden I take the time to scoop up all the poo. each morning a bucket full of straw and poo is added to my compost heap. This means the chooks are not walking in the poo which reduces the exposure to disease and pathogens.
All nests and the floor of the chook house has straw covering them. This makes it easy to scoop up poo using a small hand garden fork. I have found this so effective to maintain a clean, hygienic, chook house and nests that I have spread a few bales of straw on the floor off the pens.  The veggie patch and orchard trees will love the compost this system is regularly producing.

Monday 11 July 2011

The Chook House and Pen

I want to be a farmer, I need livestock to fuss after, I only have a 1/3 or an acre. What to do.
Don't worry I did all the holes, he's just posing
for the camera. Motorised hole digging!
The only way to dig this many holes.
I wanted enough chooks so I could bred them if I wanted and eat real chicken not the over bred super quick growing chickens we all buy in the shops.  I wanted them to be community chooks that all my neighbours could enjoy.  So I spoke to my neighbours and yes they wanted to be apart of our chooks lives. They would feed their kitchen scraps, they would look after them when I was away, and yes they would help eat all the eggs 11 chooks would supply.  Yes, Chooks, the gardeners perfect partner. Chooks will eat pests in the garden reducing attacks in the veggie patch and orchard. and all this eating the chooks will be doing will make them poo!!!!!! Great fertilizer to top off all the other benefits the chooks will bring.
All posts in now putting up top rails 
All top rails on, all side & roof netting on
Chook house well on the way
So the planning started. The chook pen would be 18m long by 5m wide. Divided into to pens with a hen house 1.8m x 1.8m tall enough to walk in with out having to bend over. Our back fence was made of sheets of old asbestos roofing. I waited for a rainy day and pulled it all down. (if asbestos is wet the fine dust particles are far less likely to cause future health issues). I triple wrapped in heavy duty black plastic and labeled it as required. My dad on one of his many visits down to us in Kallista loaded it up in his ute and took it to my Uncles landfill in NSW so it could be disposed of in an approved landfill site, all for no cost! Even better, now the real work could begin on the chicken coup. But first a few more trees needed to go to make way for the chicken pen/house which would replace the fence of two of my neighbours.Then I marked out where the pen and house would go. The thought of digging over 20 post holes 600mm deep was daunting so I hired a motorised post hole digger. Oh the bliss, oh the pleasure. It wasn't all easy going. The crow bar was needed to get through rock, remove rocks, cut through tree roots, pull out junk metal and all the other things i found while digging holes!
Starting the chook house, from the floor up!
3m posts were used 600mm deep, once all posts for the pen where in the same sized posts were used as stays to connect corner posts together, (think upside down U). Then posts were used to form a top rail to connect all posts together up the top. These help support the wire roof which makes the pen fully fox and cat proof. The wire at the bottom of the poles runs half a meter along the ground. This was then covered with soil so animals cant dig under the pen. This has worked well to date with nothing getting in when locked up at night.      

 So with the pen and house full it was time to get some chooks. My sister and family with 2  kids were staying with us at the time and the kiddies were busting to get chooks so they could check for eggs. I decided on 4 Australorps and 4
Wall and roof timber going up
Faveroles. Both good layers both very good meat birds as well.
They were young birds old enough so they didn't need artificial heat but they wouldn't be laying until they  grew out.   After a few weeks of the young kiddies wanting the chooks to lay eggs, I decided to look for some chooks that were already laying. I found 3 Isa browns advertised on Gumleaf.com.  $100 and I got 3 isa browns all laying all about 10 months old. A feeder and water container, a plastic box with 3 nests inside, some food and a wire cage to transport the chooks. A steal!!!


The young Faveroles (cream) & Australorpes
(black)  checking out the chook house


The kids and adults welcoming the chooks

So they entered the family and proceeded to bully and peck the much younger and smaller birds. So I build a partition and the 3 isa browns are locked in there at night until the others could hold there own.
The finished chook house, complete with chook doors
a door for me! & window eaves to protect from weather
Instant success within 2 days they were laying eggs and my sisters kids were excited to collect eggs each morning before going to school.